Leather Rapier Helm Build
Inspired by the Gallowglass helms in period
Project Completed February, 2014
 Quite simply, I needed to make myself new armor for the rapier field. I've been fighting rapier for 20 years now, and making things from leather for longer than that. I figured it might be time to use gear that wasn't either second hand or modern looking in order to try and represent myself better on the field. So I started to research armor of the time and discovered the Gallowglass, a group of warriors that were of both Scot and Norse decent. Given that most of their armor was metal, and I wanted to build in leather, I tried keeping the spirit of the style despite the different medium.
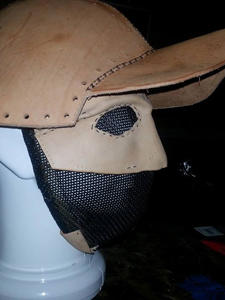
The biggest part of what I noticed in the helm of the Gallowglass was the pronounced fin on the top of the helm itself. I also noticed the baseball cap style visor that was attached. The helms that I was able to find sketches of also looked like the side flaps and back of the helms were articulated plates, so I knew that I wanted to emulate that aspect as well in order to keep functional form intact for the field itself. In the build, I have a standard fencing mask top comply with combat standards, but I've fitted it with a leather molded face mask façade as well, in order to cover the mesh with a more human form.
For the facial form, I fitted a piece of wet leather over a mannequin head and pushed it into the recesses repeatedly until I had a brow and nose formed. I exaggerated both pieces of the form in order to get more visible definition from a distance. I then stitched in the mask to the mesh of the fencing mask in order to secure it, and make sure that a blade would not slip in behind the cover up. I cut the holes to fit the ocular cavity as well, to increase visibility. It gives me a pretty good range of vision, despite covering so much of the mask. I then also stitched the cover-up to the mask itself to secure it.
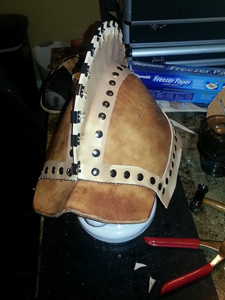
For the helm itself, I started off with some very stout leather and cut it to form a mocked up version that I'd made from card stock. I left the bill over-sized so that I could tailor it a bit after construction was complete, but stitched on the brim to the top of the helm after cutting out holes to fit my screws through. I then stitched the fin/trim together from two separate pieces to keep the grain side equaled out, turned the fin right-side out and hammered it down flat before attaching it with Chicago screws along the top and sides. Once the trim piece was on, I attached the ear flaps and stitched the face onto the helmet using the seam on the bill and a secondary hidden piece of leather framing the sides of the mask.
Once the piece was all assembled and antiqued (to give it a beaten up look), I used a combination of water, pressure and wax hardening in order to get the piece more rigid (to keep with the rapier rules).
I was pretty pleased with the finished result, even though it's a bit hard to breathe through the bottom end of the face cover-up. I'm still working with it a bit at a time to better fine tune it, but overall I think it's a pretty good first attempt at real armoring. It works out pretty nicely with a gorget that I freehanded as well.
 Photos above - left to right
1) Cardboard mock-up
Using a modified pattern from the Armor Archive to get a proper fitment. Why? Leather's not cheap, but cardboard is.
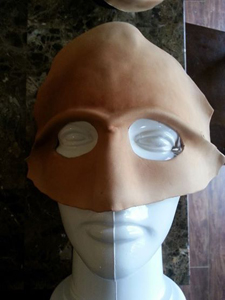
2) Wet forming the Mask
First the leather is completely soaked, then hand formed to get the brow line. Excess leather is on the top to stitch into the brim of the top and the excessive wrinkle to the nose is left in to push out the eventual draped mask
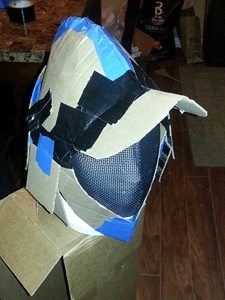
3) Attaching the mesh
The mask is stitched into the fencing mask's mesh along with excess leather on the chin and brow touch points. The top of the helm gets dry fit to determine attachment points to the mesh as well.
4) Attaching the fin
The fin in this photo is actually a dry fit. Each of the screws had to be set in place to hold the horizontal position. The clips were placed here just to determine my stitching points. Once that was done, the fin was then textured, flipped inside out and saddle stitched. Once it was stitched up, it was then flipped right side out, hammered down to flatten the seam, then screwed back down. The fin pieces were a single cut that served as trim as well. this allowed me to anchor the pieces that hang down from the top with a little bit of give, so that it remained flexible as a butted joint.
Photos left
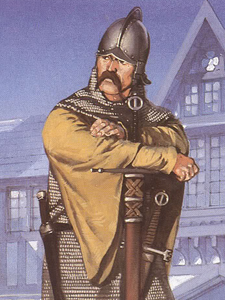
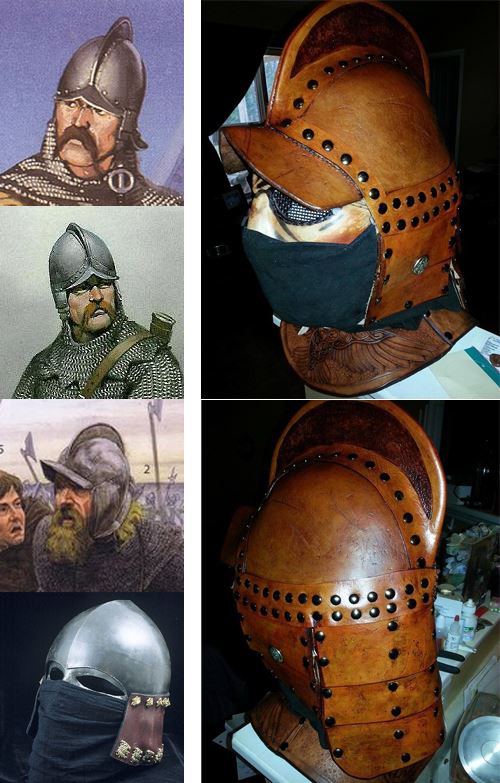
The left three images were photos that I discovered when researching the Gallowglass themselves. These served as different views of the styles of helm found in period. The two images on the right are the finished helm, for comparison.
I ended up with a slightly higher fin than the source material, but I wanted it to remain pronounced. I also carried the screws through the sides of the fin, where they would have been welded down on a steel helm.
I kept the ear and tail flaps a little more pronounced as well, so that they would stay in compliance with rapier standards. The ear flaps are attached to the mesh so that there are no seams, and the chin strap helps keep them molded to the form of the mesh.
The bottom most image is a separate helm that I found as a reference to using a fabric mask in combination with the oculars. I didn't want the modification to dominate the Gallowglass style, but I thought that it lended itself to a bit more of a cover up of the mesh itself.
Constructive feedback is both welcome and appreciated, please let me know if I missed some pertinent information or if there's somewhere I can improve.
As always, thanks for reading!
Ihone