Relief Carved Phoenix Wind Chimes
Based on period carving techniques
Project Completed August 1, 2002
Although wind and chimes have been heavily documented through the orient through the ages, the modern look and feel of wind chimes has changed dramatically. In period, the bells that were used were quite different. They were very often ornamented in traditional styles, and the ornamentation itself was on the bells or pipes instead of the piece that held them up.
This piece was meant to be more whimsical than historically accurate. In celebration for the birthday of Sacred Stone, I thought that the visual of a phoenix rising from the flames would be appropriate. I also thought that instead of the imagined shrill cries of hawks and other birds of prey, something nice and mellow would be soothing to whoever might receive this piece as a gift.
The chimes aside, the carving methodology is one that has been handed down through the seasons without fail. Many oriental pieces that were carried through the Arab regions were spectacularly carved in the likeness of the artist’s mind’s eye. European countries used relief methods as well, ornamenting churches and fountains.
Of Methods and Mayhem
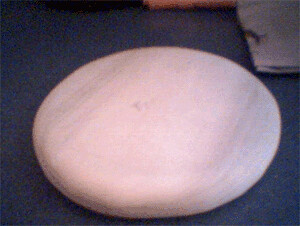
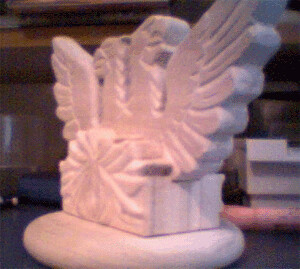
I began with a length of 6” x 1” poplar for this project. Whereas it’s much more difficult to work with than pine, I knew that poplar would hold up if this piece were to be used outside. I also gathered a length of copper pipe that is used in plumbing. I cut the basic shapes out for the phoenix, her flames, and her base. Then, using my Dremel tool (and it’s various fantastic attachments) I began to “rough out” the basic depths of the piece. Starting with the phoenix herself, I gradually built the detail to a point where I was satisfied.
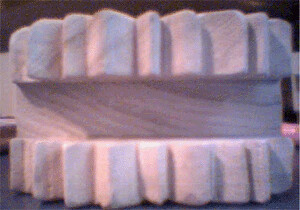
After the phoenix was completed, I drilled 3 holes in the bottom of the flames, with a bit of the poplar between the halves of the flames. I then shaved down a dowel (I can never find one that fits nicely right from the store) with a piece of sandpaper until I could put the dowel directly through the 3 bits of wood. As all folks that work with wood know very well, it’s hard to find a good length of wood that has no warp to it at all when it is stored standing on end. This was very much the case in this piece, so after putting some glue on the dowels and shifting them into place, I set my old 10 pound bowling ball on top of the pieces to laminate them together.
Once the flames had set (thank the north wind for my lady telling me that we should keep our old bowling balls), I began to carve the flames. After carving them out in the same fashion as I did with the phoenix, and after being satisfied with the result, I slid the phoenix between the flames and drilled 2 support holes from the base, through the flames, and into the base of the phoenix. I then repeated my dowel pinning process with attaching the phoenix to her base.
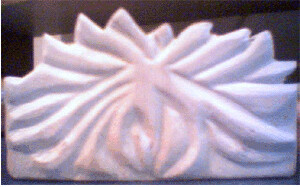
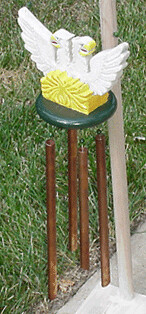
Once the phoenix top to the chimes was completed in its construction, I painted her up. After all, a lady should get “tarted” up a bit for her birthday! For painting, I chose an off-white color for the bottom coat of the phoenix and covered it well. I then used a series of 3 other colors in successive dry brushing to bring out a bit more of the detail in the carving. After I was satisfied with the main coloring, I painted in the detail of the eyes, beak, and tongue. Once the phoenix had set for a while, I started on the flames. The final color of contrast (using the same dry-brushing techniques) was an yellow and orange combination. The reason that there are so many colors within the flames (hidden for the most part) is because I was never truly satisfied with the colors. Throughout the dozen attempts at finding a good blend of colors, I think that the various coats became my blend in and of themselves. So, I let them be. After completion of the flames, I gave the base a nice coat of forest green. The next day after painting the piece, I gave it a few coats of clear enamel spray.
The chimes themselves were fairly easy to make, it was just a matter of cutting the pipe in the lengths that I wanted. To tune the pipes to find a pleasing combination, I wrapped a bit of scotch tape (it doesn’t stop the vibration) on each of the 4 pipes and held them up so that they could hit each other. A little trimming with a grinder, and I got a tapered result that had a pleasing sound. Attaching the chimes to the wood, I used screws to hold the laminated wire in place and then covered the heads of the screws with some fancy leather studs. I also added beads to the wire to cover up the excess of the wire following the knots holding it up.
Thoughts in Retrospect
I’m fairly pleased with this piece, even though it is not fully found (as is) in period. It was good practice for carving, and I think it came out pretty well. The major road block in the piece was its weight, which (upon testing it out) almost proved to be a disaster. The piece fell from the place it was hanging, and the wood landed on the pipe as it hit the ground. This left me with a little fixing, and I took off the center cord with its beater that it had originally. I find that the phoenix spinning around or shaking gives it enough “oomph” without the beater.
I’m going to definitely try to make more chimes in the future. I think that next time I will go for a nickel pipe, and put the beater back on (nickel pipe is much lighter). I have also learned how important that my sanding techniques have become to my pieces. I am feeling much more comfortable with my sanding practicesProject Photos
Click for a larger view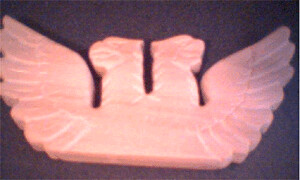
Constructive feedback is both welcome and appreciated, please let me know if I missed some pertinent information or if there's somewhere I can improve.
As always, thanks for reading!
Ihone